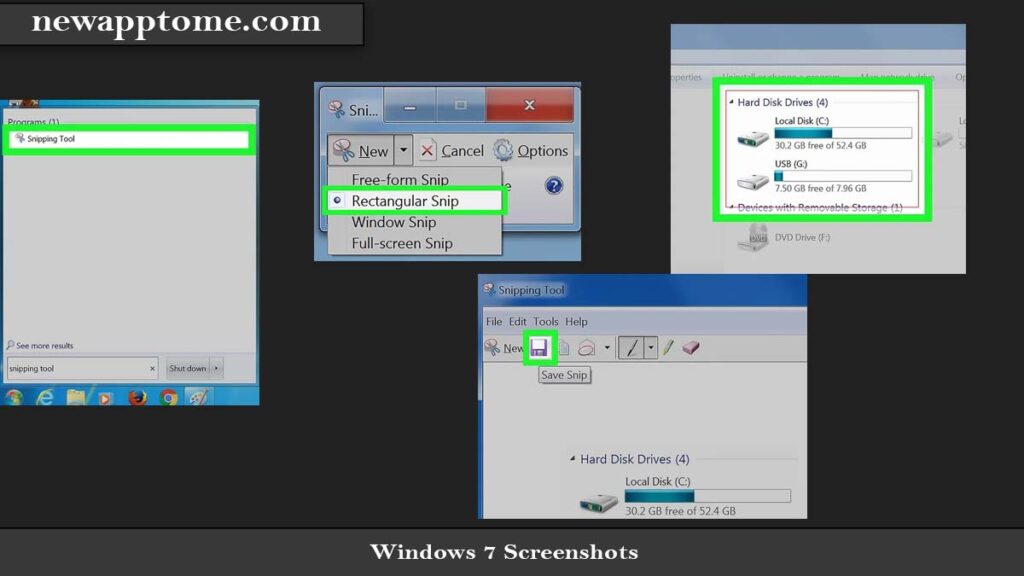
We have explained the process of taking Windows 7 screenshot in detail with more than one method. In this way, every user can easily take screenshots. He can change the screenshot and save the tool according to his needs.
What Is The Windows 7 Screen Capture Key?
The screenshot button on Windows 7 or other devices is the same. This key is the Print Screen key. This key is found on almost every keyboard. If you do not use special software after pressing the key, the save process will not occur. Only windows 7 ss import takes place. In other words, the screenshot is saved temporarily; after this stage, you need to convert it to a file with the software.

Windows 7 Screenshot (5 Methods)
There are multiple ways to take screenshots on the Windows 7 platform. The methods we recommend to you will be listed in a mixed order. Some software only allows you to save the Windows 7 Screenshot you have taken, and some software is used to take a screenshot in an advanced way. For example, if you want to take cropped Windows 7 Screenshot instead of a full-screen image, the excerpt tool will do the trick.
Getting SS with the Snipping Tool
Use the citation tool built into Windows 7 for Windows 7 screenshot taking. Follow the steps to open and use the device;
- Click start and click the “Snipping Tool” application from the list.
- If it is not visible, search for the application we mentioned in the search section with its full name and open it.
- After the application is opened, it immediately goes to the ss receiving location; at this stage, hold the mouse and select the area you want to save. Release the mouse after drawing/selecting the size.
- Finally, click the File > Save As button at the top and save the image as a file.
- If you want to get a new image, it will be enough to click the New button in the upper left.
If the quote tool works for you and you will use it frequently, you can pin it to the taskbar. To do this, right-click the app from the start menu and click “Pin to taskbar.”
Recording a Screenshot with Paint
- Taking screenshots with Paint is pretty straightforward. If you want to edit the screenshot, you need some knowledge and experience. If you say I can’t deal with it, the citation tool will be a more practical solution for you.
- Press the Print Screen button to take a screenshot.
- Click the start icon and type Paint, and open it.
- Press the CTRL + V key to transfer the image you took to Paint.
- Finally, click the save icon at the top of the window and complete the Windows 7 screenshot process.
Taking a Screenshot with LightShot
LightShot is a third-party screenshot program. It is pretty similar to the snipping tool. After downloading LightShot from the official website and installing it on your computer, follow the steps below. This explanation was made for version 5.5.0.7.
How to Take Windows 7 Screenshots?
You can use two different options to take a screenshot with LightShot. First, with LightShot turned on, press the Print Screen key. If your key is broken, click the system tray from the bottom right and left-click LightShot once.
Then select the desired region or full screen for Windows 7 ss import.
Finally, click on the save icon at the bottom right of the selected area.
Capture and Save Screenshots with PhotoScape
With PhotoScape, you can take screenshots and save them. This tool works in the same logic as the others. This explanation was made over version 3.7.
- Taking Screenshots with PhotoScape
- Download and install PhotoScape, and then open it.
- windows 7 gets ss
- Enter the “Screen capture” section at the bottom of the menu.
- windows 7 gets ss
- If you want to take a full-screen Windows 7 screenshot, click on the “Capture Full Screen” option.
- Click “Capture Window” if you want to capture part of the open window or “Capture Region” if you’re going to make a unique selection. After capturing the image, close.
- “Screen Capture” and return to the main program. Click the “Save” button in the lower right.
- Click on “Save As” and save.
Just Recording Screenshots with PhotoScape
Save the image with the PrintScreen button.
Open PhotoScape and click on “Editor.”
Press CTRL+V and save the image to your disk with “Save > Save As” in the same way.
Taking Screenshots with Browser Plugins
If you’re using Chrome, Edge, or a different browser, you can go to their web store to get screenshot plugins. This will make your job easier, especially if the screenshots you take are mainly on the browser. In addition, it is possible to save the entire page at once in such plugins.
Other Article: How to Change Your Password in Windows Best 3 Method